Showing posts with label Windows. Show all posts

Saturday, November 4, 2017

Need to zip files in Windows 10? It’s easy – and no new software required

Need to zip files in Windows 10? It’s easy – and no new software required 

If sharing large photos or video filesis part of your daily workflow, you know that file compression is a big part of the process. For instance, if you want to email a large batch of photographs captured during a trip, sending all those files as they are may take a long time to transmit and receive. Plus, the photos will eat up precious space in your outbound box as well as the recipient’s inbox. The same goes if you’re using a cloud service like Dropbox or Google Drive.
In the old days, you were forced to rely on third-party software to compress and un-compress files. You can still use those programs today, but Microsoft baked file compression capability into Windows back in 1998. While Windows 10 (as well as MacOSand ChromeOS) has you covered for ZIP compression, you’ll have to turn to third-party software for file compression formats such as RAR and 7z.
Unpacking a ZIP file is extremely easy, but packing a ZIP-based suitcase for your files isn’t quite as obvious. We’ll first show you how to compress a file in Windows 10, followed by an entire folder. After that, we will demonstrate how to unpack a ZIP file, so that you can get access to the uncompressed files again. Let’s get started!

ZIP A SINGLE FILE

How to zip a file in Windows 10
You’ll want to use this method if a single file is extremely large, such as video shot with a smartphone or digital camera.
  1. Locate File Explorer on the Windows 10 taskbar (the folder icon).
  2. Locate the file you want to compress.
  3. Right-click on the file.
  4. Select Send to on the menu.
  5. Select Compressed (zipped) folder in the next menu.
  6. Rename your new ZIP file, and press the Enter key.

ZIP MULTIPLE FILES

How to zip a file in Windows 10
This method is handy for cramming multiple files together, for both size and organizational reasons. This is smart idea when you’re sending files, and also just to keep files together to free up disk space.
  1. Locate File Explorer on the Windows 10 taskbar (the folder icon).
  2. Locate the files you want to add to a single ZIP file.
  3. Select all files by holding down the mouse button and dragging the pointer across the screen. Your mouse will create a blue selection box. All files within this box are highlighted with a light blue color.
  4. Release the mouse button and right-click on the light blue highlighted files.
  5. Select Send to on the menu.
  6. Select Compressed (zipped) folder in the next menu.
  7. Rename your new ZIP file, and press the Enter key.

ZIP an entire folder

How to zip a file in Windows 10
If you want multiple files in a single folder, this is the method you choose. When unpacked, all files will unload in a folder created during the compression process.
  1. Locate File Explorer on the Windows 10 taskbar (the folder icon).
  2. Locate the folder you want to add to a single ZIP file.
  3. Right-click on the folder.
  4. Select Send to on the menu.
  5. Select Compressed (zipped) folder in the next menu.
  6. Rename your new ZIP file and press the Enter key.
Finally, let’s demonstrate how you can unpack a ZIP file in Windows 10.

UNPACK A ZIP FILE

How to zip a file in Windows 10
Zipping files is only helpful if you can extract them as well. Windows 10 uses an algorithm to scan your file, temporarily remove all repetitive information, and create a new file with a smaller size and a new file extension: ZIP. To revert the file back to its former state, Windows 10 scans the file to see what was removed, and inserts the repetitive information back into the file. Here’s how to do it:
  1. Locate File Explorer on the Windows 10 taskbar (the folder icon).
  2. Locate the file you want to decompress.
  3. Right-click on the file.
  4. Select Extract all on the menu.
  5. On the next pop-up screen, select where you want Windows 10 to unload the files.
  6. Once you choose a location, click the Select Folder
  7. Finally, click the Extract button.

Monday, December 12, 2016

Sunday, December 11, 2016

How to encrypt and password-protect ZIP files the right way


 An anonymous reader asked “Is there any way to crack a password-protected zip file?”

That question can be interpreted two ways. Do you want to hack into someone else’s private files? Or do you want to avoid a form of encryption that won’t give you much protection? Since I believe that most PCWorld readers are inherently good people, I’ll assume that you simply want to be assured that your files will not be cracked.

For some years now, the .zip format—intended primarily for compression—has provided encryption as an added feature. But what kind of encryption it provides depends on the program you use to create and open the ZIP file.

The .zip format supports two forms of encryption and password protection. The first, nicknamed ZipCrypto, is relatively easy to crack. I’m not saying that anyone could do it, but the Info-ZIP organization calls ZipCrypto ”quite weak”—a view shared by other organzations as well.

You’d be far safer using the other option, AES-256. Unlike ZipCrypto, AES was not designed for ZIP files. It’s a popular and extremely strong encryption technique used in many programs. Assuming you use a strong password, it’s for all practical purposes unbreakable.
But when you use it for ZIP archives, AES-256 comes with another problem: Windows’ own, built-in compression tool doesn’t support AES. Email someone an AES-encrypted file, text them the password (safer than emailing it), and if they try to open it in Windows Explorer or File Explorer, they won’t be able to open any of the files within the archive.
Fortunately, most third-party zip tools, including the free 7-zip, support AES-256. To encrypt an archive in 7-zip, once you’re at the Add to Archive dialog box, enter a password and select the Encryption method AES-256. You’ll find these options near the lower-right corner of the dialog box.
One more problem with encrypted ZIP files: No matter which form of encryption you use, anyone with access to the files can see the name of the files within the archive. If the file names provide sensitive information, a thief could take advantage of that. Of course, they would not be able to open any of the files without the password.

Tuesday, December 6, 2016

HOW TO PASSWORD A PDF FILE

A reader asks:
“Is there any way to password-protect and lock a sensitive PDF file before sending it as an attachment through email? I cannot afford Adobe Acrobat Pro and free primopdf didn’t work for me. Any help will be appreciated!”
The quickest way to do this is to ZIP the PDF file and protect the ZIP file, or use Microsoft Office’s built-in encryption tools to create a password. If you use Outlook, you can use Adobe Acrobat IX to password protect PDFs. You can also try programs like NitroPDFand PDF Encrypt to set the password protection to your PDF file without Acrobat.

Monday, December 5, 2016

Sunday, December 4, 2016

Saturday, December 3, 2016

Friday, December 2, 2016

Guardians of the Galaxy game UK release date and gameplay rumours, plus trailer

Guardians of the Galaxy game UK release date and gameplay rumours, plus trailer

Here's everything we know about Telltale's episodic game of Marvel's Guardians of the Galaxy

Guardians of the Galaxy is Marvel's first game in partnership with Telltale Games, who've already made games based on The Walking Dead, Batman, and Game of Thrones. Here, we discuss the potential release date for the five Guardians of the Galaxy episodes, along with what to expect in terms of gameplay and storyline.

Guardians of the Galaxy game UK release date rumours: When is Guardians of the Galaxy episode one coming out in the UK?

Guardians of the Galaxy game UK release date: 2017

All we know for sure about the release of the first episode of Telltale's Guardians of the Galaxy game is that it's due some time in 2017. Telltale confirmed the 2017 release date in a blog post shortly after revealing the game at The Game Awards 2016, writing that the five-part episodic series will "premiere digitally in 2017."
We can speculate about a more precise release date though. Guardians of the Galaxy Vol. 2, the upcoming sequel to the first film, hits UK cinemas on Friday 28 April 2017, and it's a pretty reasonable guess that Marvel and Telltale will be timing the release of the game's first episode to capitalise on the excitement around the film's release. That means we can likely expect Guardians of the Galaxy Episode One to release some time in April 2017, with the remaining four episodes over the following few months. 
As for release platforms, the game will apparently come out on "home consoles, PC, and mobile devices." That means we can expect it on the PlayStation 4 and Xbox One, along with Android and iOS, and maybe even the Nintendo Switch.

We’ll update this section with more information as soon as it becomes available.

Guardians of the Galaxy gameplay rumours: What can we expect from the Guardians of the Galaxy game?


We don't know much about the game yet beyond its official title: Marvel’s Guardians of the Galaxy: The Telltale Series. 
Telltale released a first teaser video for the game (shown above), but it doesn't reveal much except that fans can expect the same sort of tongue-in-cheek soundtrack choices that helped make the Marvel film so popular. Thankfully, Telltale co-founder and CEO Kevin Bruner has revealed a little more about what to expect in the official blog post.
"The energizing blend of humor, emotion, teamwork, and full-on sci-fi action-adventure of the Guardians provides an enormously satisfying space to explore through Telltale’s unique style of interactive storytelling. In Marvel’s Guardians of the Galaxy: The Telltale Series, players will take on multiple roles within the ragtag band of heroes, and take the pilot’s seat in directing their escapades around the universe. We are always honored to be working with the best creative partners and storytellers in entertainment, and working with Marvel on this series leaves us excited to share what we’ve been developing when it premieres in 2017."

That sounds about like what we'd expect from one of Telltale's games, which have popularised episodic interactive storytelling. Going by previous Telltale titles like The Walking Dead and Batman, we can expect some branching narrative options and hefty moral choices, with more of an emphasis on interacting with other characters than on big action-packed set pieces. 

There's no word yet on whether the Guardians of the Galaxy game will be the first to sit within the official continuity of the Marvel Cinematic Universe, or on whether we can expect cast members like Christ Pratt, Zoe Saldana, and Bradley Cooper to reprise their roles from the film. 
This is expected to be the first of several Marvel games that Telltale is working on, but neither company has revealed what other titles they might be working on. We'll update this as we know more about the Guardians of the Galaxy game and any of the other projects.
RELATED:

Wednesday, November 30, 2016

WHAT IS A GRAPHICS CARD?

WHAT IS A GRAPHICS CARD 

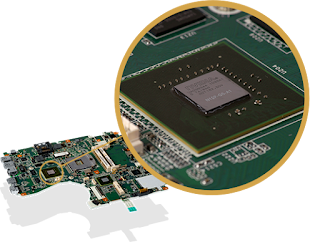
Graphics cards are also known as video cards are the part of a computer that are responsible for generating a feed of output images to display, either to your computer’s screen or to an externally connected display (a monitor or television).

Google Maps – latest update shows you how the world has changed over the years

NEW UPGRADE to Google's worldwide map reaches back in time to show off our changing planet.


GETTY
Google Maps users can now look back in time to see the Earth changing
Google Maps users will now be able to get a much more in-depth look at how the world has changed in recent years thanks to a major new upgrade.

Tuesday, November 29, 2016

How to restore your Windows Vista / Windows 7 computer to its factory settings

First, back up your stuff!


Before you reset your system, you’ll want to back up important information that you don’t want to lose. This includes documents, photos, music, and movies, but there are other items to back up as well. Make sure that you know all of your saved passwords, export all of your browser bookmarks, and have installation files for all the software you’ll want to reinstall — or know where to get them.Also, make sure you back up app-specific data, like custom filters saved in a photo utility and save files from your favorite games. If you use Microsoft Outlook, you’ll want to export your email file as well so that you can back it up.
While you can backup these files manually, you may be better served by using backup software that automates the process, reducing the room for error and saving you time. You might be able to use the cloud for this, but there’s a great chance that the volume of data will exceed the capacity of a free Google Drive (15GB) or DropBox (2GB) account. If you’re willing to spend some money on a monthly basis, then you can go with a dedicated cloud backup solution like Carbonite.

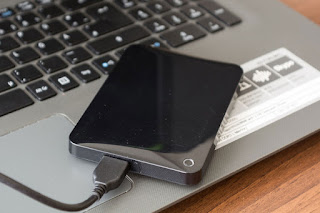
Even cloud services can have issues, however, and so it’s not a bad idea to budget for an external hard drive if you don’t already have one. The best option is an external drive enclosure that holds two drives that can be mirrored, so that if one drive fails you have a backup. You can also use a non-OS internal drive in a desktop if enough space is available.
An even more advanced option is to purchase a network-attached storage (NAS) device that can be connected to your router and accessed by all of the machines on your network. A NAS device with mirrored drives lets you copy and back up all of your information scattered around in single, relatively reliable place that can even be easily removed in the case of emergency.

Whichever route you choose, configure your backup software to save to your chosen drive. Then, it’s important to make sure to disconnect your backup drive before you actually perform the Windows 8/8.1 reset. The following process shouldn’t delete data on a secondary drive, but it’s better to be safe than sorry. We’ve broken the guide down below based on your current operating system.

WINDOWS VISTA / WINDOWS 7

Windows Vista and its successor, Windows 7, do not have the built-in refresh and reset options found in Windows 8 / 8.1. Users with these operating systems have two choices when looking to perform a factory reset.

The first is to re-install Windows from scratch, which isn’t a factory reset at all unless you have all the original, factory-provided install media available.  Still, if you want to wipe your computer completely clean and start from scratch, this is probably your best option. You can reinstall by opening Recovery (do a Windows search for it), selecting Advanced Recovery Options, and then selecting Reinstall Windows. 
Your second option is to use a manufacturer-provided recovery tool and factory provided recovery partition. Here are common names for recovery software from each major PC manufacturer. Entering these terms into Windows’ desktop search tool can help you find them.

  1. Acer: Acer eRecovery or Acer Recovery Management
  2. ASUS: ASUS Recovery Partition or AI Recovery
  3. Dell: Dell Factory Image Restore, DataSafe, Dell Backup & Recovery, and a variety of other names
  4. Gateway: Gateway Recovery Management
  5. HP: HP System Recovery or Recovery Manager
  6. Lenovo: Rescue and Recovery ,or ThinkVantage Recovery (on ThinkPads)
  7. Sony: Sony Vaio Recovery Wizard
You can also access recovery from outside Windows, which is useful if you can’t find the software, or if Windows won’t load. To do this, reboot your computer, and pay close attention to the boot screen that appears before Windows loads. Keep an eye out for a shortcut key that brings you to the recovery interface. In most cases, the key will be F11.

Note, though, that you do need a recovery partition for these methods to work. If you don’t have one, your only option will be to perform a full reinstall of Windows.


POST-RESET CHORES

You may think that you’re done after you perform your factory reset, and in a general sense that’s true. Your computer may work very well in its factory state. However, most systems are improved over time by new hardware drivers, which you may have had installed on your system. They’ll now be gone and, in some cases, certain hardware may not work at all until the appropriate driver is installed. If you’re using Windows 10, simply head to the Updates tab in the Settings and your system should grab most of what it needs from the Microsoft servers, including chipset, GPU, and peripheral drivers.
You can often download these drivers by visiting the system manufacturer’s support page, and searching for your specific system. This is where you’re most likely to find motherboard and adapter drivers, as well as drivers relating to specific system functions (controlling display brightness via keyboard shortcut on a laptop, for example).

If you have a discrete graphics card, you’ll also want to visit AMD or Nvidia’s website (depending on who made your GPU) and download new drivers. These usually aren’t posted on manufacturer support pages.
Finally, install the drivers for any peripherals you use with your system. These will not be installed since they didn’t ship from the factory with your PC.

Conclusion

This is everything you need to know about restoring Windows to its initial state. Hopefully, the process has improved performance and decluttered your drive, or prepared it for passing along to someone else. If you’re still having problems, it may be because of faulty hardware or, if your system is getting on in years, then you may want to upgrade or replace it entirely.


How to restore your Windows 8/8.1 computer to its factory settings

First, back up your stuff!


Before you reset your system, you’ll want to back up important information that you don’t want to lose. This includes documents, photos, music, and movies, but there are other items to back up as well. Make sure that you know all of your saved passwords, export all of your browser bookmarks, and have installation files for all the software you’ll want to reinstall — or know where to get them.Also, make sure you back up app-specific data, like custom filters saved in a photo utility and save files from your favorite games. If you use Microsoft Outlook, you’ll want to export your email file as well so that you can back it up.
While you can backup these files manually, you may be better served by using backup software that automates the process, reducing the room for error and saving you time. You might be able to use the cloud for this, but there’s a great chance that the volume of data will exceed the capacity of a free Google Drive (15GB) or DropBox (2GB) account. If you’re willing to spend some money on a monthly basis, then you can go with a dedicated cloud backup solution like Carbonite.

Even cloud services can have issues, however, and so it’s not a bad idea to budget for an external hard drive if you don’t already have one. The best option is an external drive enclosure that holds two drives that can be mirrored, so that if one drive fails you have a backup. You can also use a non-OS internal drive in a desktop if enough space is available.
An even more advanced option is to purchase a network-attached storage (NAS) device that can be connected to your router and accessed by all of the machines on your network. A NAS device with mirrored drives lets you copy and back up all of your information scattered around in single, relatively reliable place that can even be easily removed in the case of emergency.

Whichever route you choose, configure your backup software to save to your chosen drive. Then, it’s important to make sure to disconnect your backup drive before you actually perform the Windows 8/8.1 reset. The following process shouldn’t delete data on a secondary drive, but it’s better to be safe than sorry. We’ve broken the guide down below based on your current operating system.

WINDOWS 8 / 8.1

Windows 8 has two built-in reset options that can be accessed by opening the Charms bar, hitting “Change PC Settings,” and then visiting the Update and Recovery tab.

The first option is a refresh. Unlike a full restore or reinstall, a refresh keeps your personalized settings, and also any apps downloaded from the Windows Store. Everything else gets deleted and/or restored to its default setting. While this is not a full reset to factory settings, it’s pretty close and may solve performance problems with less inconvenience.
Performing the refresh is simple. Just click the “Get Started” button under the “Refresh” heading in the “Update and Recovery” tab, and you’ll enter a wizard that guides you through the process, which is surprisingly quick. You do need an active Windows Recovery Partition for a refresh to work, but most systems come with one enabled from the factory. If you don’t have a recovery partition, you will need installation media (a disc or USB with a Windows installer on it).

Your second option is the reset, which is also under the Update and Recovery tab, and is listed under “Remove everything and reinstall Windows.” A reset gets rid of all your settings, files, and apps, restoring Windows 8 to its out-of-the-box defaults. Once again, you’ll either need a recovery partition, or installation media to complete the process.
If you don’t have a recovery partition or installation media, then your options are more limited. Microsoft is no longer providing the installation image for reinstalling Windows 8.


POST-RESET CHORES

You may think that you’re done after you perform your factory reset, and in a general sense that’s true. Your computer may work very well in its factory state. However, most systems are improved over time by new hardware drivers, which you may have had installed on your system. They’ll now be gone and, in some cases, certain hardware may not work at all until the appropriate driver is installed. If you’re using Windows 10, simply head to the Updates tab in the Settings and your system should grab most of what it needs from the Microsoft servers, including chipset, GPU, and peripheral drivers.
You can often download these drivers by visiting the system manufacturer’s support page, and searching for your specific system. This is where you’re most likely to find motherboard and adapter drivers, as well as drivers relating to specific system functions (controlling display brightness via keyboard shortcut on a laptop, for example).

If you have a discrete graphics card, you’ll also want to visit AMD or Nvidia’s website (depending on who made your GPU) and download new drivers. These usually aren’t posted on manufacturer support pages.
Finally, install the drivers for any peripherals you use with your system. These will not be installed since they didn’t ship from the factory with your PC.

Conclusion

This is everything you need to know about restoring Windows to its initial state. Hopefully, the process has improved performance and decluttered your drive, or prepared it for passing along to someone else. If you’re still having problems, it may be because of faulty hardware or, if your system is getting on in years, then you may want to upgrade or replace it entirely.


Common problems with installing Windows 10, and how to fix them

Common problems with installing Windows 10, and how to fix them

Windows 10 is an impressive improvement over Windows 8, and until July 29, 2016, it’s a free upgrade for Windows 7 and 8/8.1 users. But any time you upgrade your operating system, you risk something going wrong. Like any complex piece of software, Windows 10 and its installation process are vulnerable to mistakes, glitches, and hardware errors. That being the case, here are some of the most commonly-encountered problems that arise when installing or upgrading to the new version of Windows, and how to solve them.

LOW DISK SAVE 

Windows 10 requires quite a bit of free disk space on your hard drive or solid state drive in order to install. The 32-bit version of the OS — used mostly on tablets and less expensive laptops at this point — needs 16GB of free space, the 64-bit version needs 20GB, and if you’re installing from a file stored on your computer itself with the Microsoft upgrade tool, you’ll need an additional 2 to 4GB just for the installation files
If you have a full storage drive, or a small one to begin with, you’ll need to make some room. The quickest way to do this is to uninstall space-hogging programs. Robust, 3D games and complex packages like Adobe Creative Suite take up gigabytes of space in and of themselves. Uninstall them and be sure to back up any save files or settings. Don’t worry, you can re-install them from the installation discs or with a download once Windows 10 is properly set up.
Should you still need, it’s recommended you remove files in the following order: video files, audio files, images of all kinds, then documents and other files. An external USB hard drive is the quickest and easiest way to accomplish this — simply save any files you can’t delete to the external media, and they’ll be easy to restore once you’ve installed Windows 10. Afterward, empty the Recycle Bin to clear the deleted files, or run a program like CCleaner to clear out your browser caches, logs, and other things that take up storage space.
To check your progress, click the Start button, type “This PC,” and click the result. The drive labeled “Windows” is what Windows 10 will install to — make sure you’ve got at least 20GB free, preferably a little more, just to be safe.

ISO IMAGE ISSUES

If you’ve used the Microsoft Media Creation tool to burn a disc or create a bootable USB drive to install Windows 10, it’s possible that the media itself is damaged or corrupt. This will result in a failed or damaged installation. Sadly, it’s extremely difficult or impossible to modify the files once they’re written to the disc or drive. You’ll need to run the tool again to install Windows 10, which may necessitate access to another laptop or installing your older version of Windows again.

If you continue to experience problems after creating multiple installation media and trying to install Windows 10 more than once, you may have a persistent hardware problem. The CD/DVD burner or the USB drive you’re using may be faulty. If possible, try using a different USB drive or an external disc burner. The Windows 10 setup program also allows you to install the operating system directly on the storage drive, with no external discs or drives necessary, so consider mounting the ISO from within your current version of Windows and running the installer directly.


ERROR CODES

Sometimes during the Windows installation process, the program will stop and display an error code. There are hundreds of possible error codes and at least as many potential problems. The best thing to do in this situation is to write down the code — you may not be able to copy it from the display screen — and search the internet for the core problem, and hopefully, a solution.

Here are some of the steps you can take if there’s no reliable information for your specific code:

  1. Unplug any unnecessary devices from your computer. Laptops should have nothing plugged in at all (except a power cord), and desktops should only have a monitor, mouse, and keyboard attached.
  2. For desktops, remove or disconnect any unnecessary internal hardware. If your PC includes an integrated graphics card or sound card on the motherboard, remove any standalone cards. Unplug any secondary storage drives (but not the primary OS drive), disc drives, card readers, and extra hardware such as a fan controller or USB extension connected to a PCI port.
  3. If you’re upgrading your PC and you’ve selected a standard upgrade that preserves your programs, remove unnecessary programs before beginning the installation process. Anti-virus programs and drivers for devices like game controllers seem to have the most trouble during the upgrade process.
  4. Alternately, simply install the operating system “cleanly,” preserving your personal files but not the programs. To do so, select Custom: Install Windows instead of Upgrade during the setup process (you will need a license code). You can re-install your programs later.

Microsoft also offers a list of potential Windows 10 installation error codes, and what they mean.


INCOMPATIBLE HARDWARE

Windows 10 runs on a variety of hardware, including Atom-based tablets and other low-power systems, but it does have minimum requirements. If your computer has a processor with a speed of less than 1GHz — or RAM totaling less than 1GB for the 32-bit version or 2GB for the 64-bit version — the setup wizard will not allow you to complete the installation. Desktop users can often upgrade their RAM or processor, but very few system will allow you to replace the CPU alone. In that case, you may be out of luck.