Instagram is the most popular social media service in the world. Yet, despite this, the company still doesn’t offer a good method for desktop users to explore the service. If you don’t have access to a smartphone that runs Android or iOS, you’re typically limited to Instagram’s website.
While there, you can browse images, peruse profiles, and comment as you please, but you cannot upload or edit photos. This is because the service wants users to take and edit photos in the moment, which means using your phone – at least according to Instagram co-founder Kevin Systrom.
While the company’s position is understandable, it’s little comfort to users who want to edit their photos on a desktop machine. Thankfully, there are workarounds for both Windows and MacOS users, so long as you don’t minding putting in some effort. Below are some of the best methods available.
The most reliable, cross-platform solution? Use an Android emulator
Instagram doesn’t have an official application for Windows or MacOS, but it does run on Android. As such, if you run an Android emulator, you can run Instagram on your desktop as if it were a smartphone. There are a few popular Android emulators out there, but we prefer BlueStacks, which works on both Windows and MacOS.
First, head to the BlueStacks website, download the application, and follow the installation instructions. Afterward, log in with your Google account or create a new one.
Next, click the search button and type “Instagram” in the entry field to search for the app in the Google Play Store. Once found, download and install it. Note that when trying to install Instagram through BlueStacks, you may receive an error message claiming that the package file is invalid. To resolve this, close BlueStacks and download the file mentioned on this support page. Afterward, download Instagram and launch the app.
Once launched, log in with your Instagram credentials as you would normally, or create a new account if you do not already have one. You will be able to browse Instagram and upload or edit photos, just as you would on a phone.
If your computer has a built-in webcam, or there’s one attached to your machine, you can take take selfies using Instagram’s camera function. If you want to upload pictures from a camera or a different source, however, you will need to transfer those files from your computer’s hard drive to BlueStacks.
In Windows this process is easy. First, go to the BlueStacks Settings — you can access the settings by clicking the All Apps button on the homepage and selecting BlueStacks Setting.
This will allow you to browse your computer and select the files you wish to transfer. Select the image files you want to transfer and they should automatically appear in Instagram, under the Gallery tab.
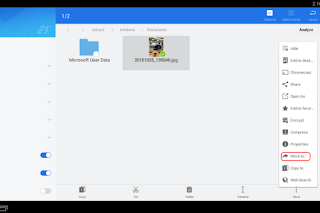
On a Mac, the process is a bit more involved. BlueStacks currently doesn’t offer a built-in function for importing files from a Mac hard drive, so you’ll need to install an app like ES File Explorer to handle the process.
In BlueStacks, go to the search bar and enter “ES File Explorer.” Once found, download it from the Google Play Store and launch the app in BlueStacks.
If you have your pictures saved in your Mac’s Pictures folder, click on it. You should be able to see and select the files you want to transfer.
Alternatively, use a third-party appNow, they will be available in your Android emulator and accessible via Instagram!
If emulating Android seems like too much hassle, there are a host of third-party apps available for both Windows and MacOS that will allow users to run Instagram on their computer. Popular examples are Instapic (Windows) and Flume (Mac). Keep in mind that Instagram does not officially support any of these programs, however. In fact, the company tries to limit their functionality, and they may not always function properly. Running an Android emulator will probably be the best option.


0 comments:
Post a Comment